In the grand narrative of digitization, Wavlink extenders play a commendable role. The setup of Wavlink extenders transforms internet dead zones into vibrant connectivity hubs. Users can effortlessly access extender settings through either wifi.wavlink.com or ap.setup. Embracing this technological evolution, Wavlink extenders become essential contributors to the seamless experience of the digital era.
They are unaware, though, that the 192.168.10.1 IP address can also be used to control the Wavlink extension.
Wavlink WiFi, if you are not familiar with the same truth, you could find this page useful.In this section, we’ll walk you how to connect to 192.168.10.1 using a Wavlink WiFi extender.
Before we begin, let’s go over the requirements for using the 192.168.10.1 IP address to access the Wavlink extension.
Requirements to reach 192.168.10.1 IP address
- Power outlet
- An AP or router that has previously been set up
- a secure web browser
- The extension for Wavlink that you have
After obtaining the aforementioned items, you may begin the process of utilizing the 192.168.10.1 IP address to access the Wavlink WiFi extender. That’s how.
How to access the 192.168.10.1 IP address
- Turn on the Extender
Let’s start by putting the IP address 192.168.10.1 into your Wavlink WiFi extender and setting it on.For this, attach the extension to the power outlet. Check the security of the connection. After that, push the Power button to turn on your range extender.
- Join the Wavlink Extender to the Router
Establishing a connection between the host router (AP) and the Wavlink range extender is the next stage. If your Ethernet connection is damaged, you will not be able to access the 192.168.10.1 IP address, regardless of how fast Gigabit speeds it gives.
Just so you know, when there are cuts in the Ethernet cable or the connection is loose, external noise interferes with the signal transmission. As a result, while connecting your Wavlink WiFi devices, you must be extremely careful.
- Launch a Web Browser
Turn on the computer if you have access to it. Make sure it is free of viruses. Open a web browser when your PC is ready to go. The web browser has to be current and clean of browsing history, cookies, and cache. If your browser doesn’t support these, go to the Settings menu and fulfill these conditions.
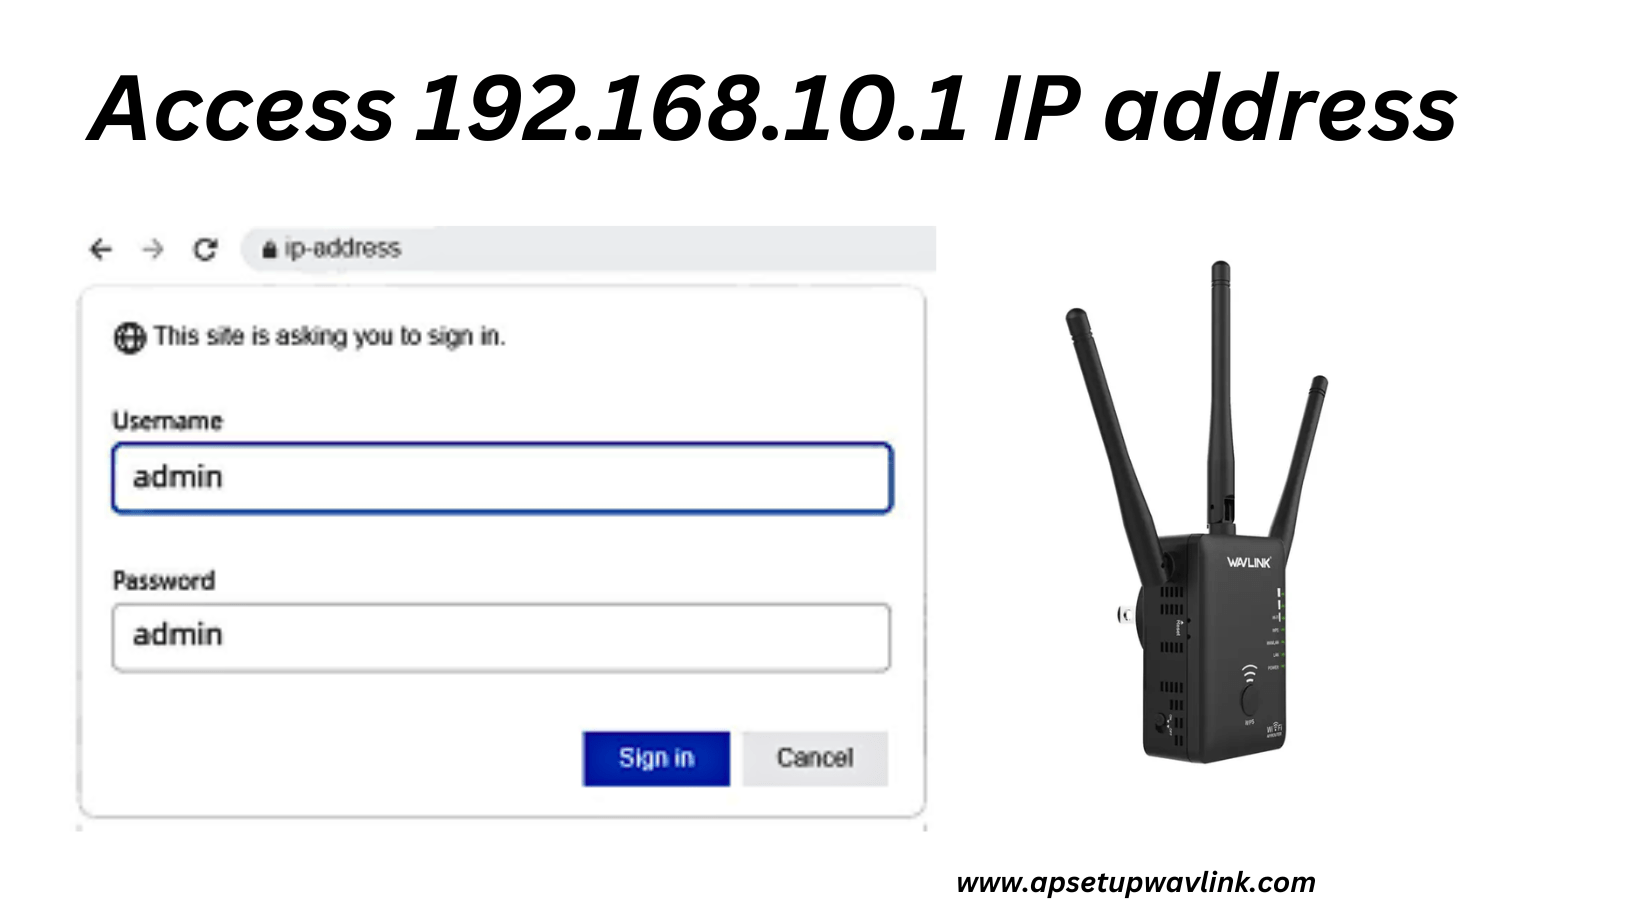
- Enter the IP address 192.168.10.1.
- Move the pointer to the web browser’s address bar. Enter the IP address 192.168.10.1. Make sure you type the IP address exactly as it appears.
- Press Enter once you have completed entering and verifying the IP address. Pressing Enter will bring up your Wavlink WiFi extender’s admin page.
- Refrain from navigating to 192.168.10.1 IP using the search box. When you do this, a ton of results appear, but there isn’t a gateway to the Wavlink extender’s settings.
- You’ve now successfully navigated to the IP address 192.168.10.1. This, however, is not enough to manage the Wavlink extension.
- The most crucial step needs to be finished before you can access the extender’s settings: Wavlink WiFi extender login.
- To do this, fill out the required form with the default Wavlink extender password and click Login. The Wavlink WiFi extender setup will begin as a result. Now, adjust the Wavlink extender’s parameters to your liking.
- It’s crucial to modify the Wavlink router’s default password after the installation process. This is because the default Wavlink router password is known to all but three parties.
Cybercriminals will be able to simply access and control your Wavlink router in their own manner if nothing is done. You may stop this from occurring by changing the password on your Wavlink router
How do i change the password on my wavlink router?
- On your computer, launch Google Chrome or a similar web browser.
- In the URL field, type the IP address of the Wavlink router.
- Enter to view the admin login page for the Wavlink router.
- Once there, fill in the designated field with the Wavlink router’s default password.
- You will be taken to the Wavlink WiFi router setup page after clicking Login.
- Select System Setup.
- Enter the new password for your Wavlink router in the box that follows.
- Click Save.
Quick Tip: Set a strong password for your Wavlink router. It is possible to combine letters, digits, and special characters.
The Wavlink router password can be modified in this manner. Your Wavlink WiFi router will no longer be accessible to unauthorized users. In the future, while logging into the Wavlink router admin, don’t forget to use the new password.
Sum up!
We have now completed our tutorial on how to access the Wavlink extender’s 192.168.10.1 IP address. We hope that by following the above instructions, you will be able to successfully access the dashboard of the Wavlink extender.
Read More